Objective
In my previous post, I implemented several logical servers on my Proxmox home server machine:
“templ-ubuntu”, “home-devdepserver”, and “home-utilityserver”.
See Architecture of my home server
.
I now want to develop an initial demonstration web application in Golang with a MariaDB database,
using the central repository for source code storage.
The application then needs to be delivered as OCI container and stored in the central binary registry.
Next, an application execution server environment needs to be created on my home server.
The created containerized application and database needs to be deployed to this server environment.
For this, I’ll install “home-testappserver”, and “home-prodappserver” as logical servers.
Finally, I want to make this deployed web application publicly accessible via tunneling.
The application should be accessible via a link in the “Demo” page of my Cloudflare website.
In this post, I want to complete my “virtual data center” with communication middleware for this.
Cleaning up existing “home-pve” and “home-backupserver” will follow later.
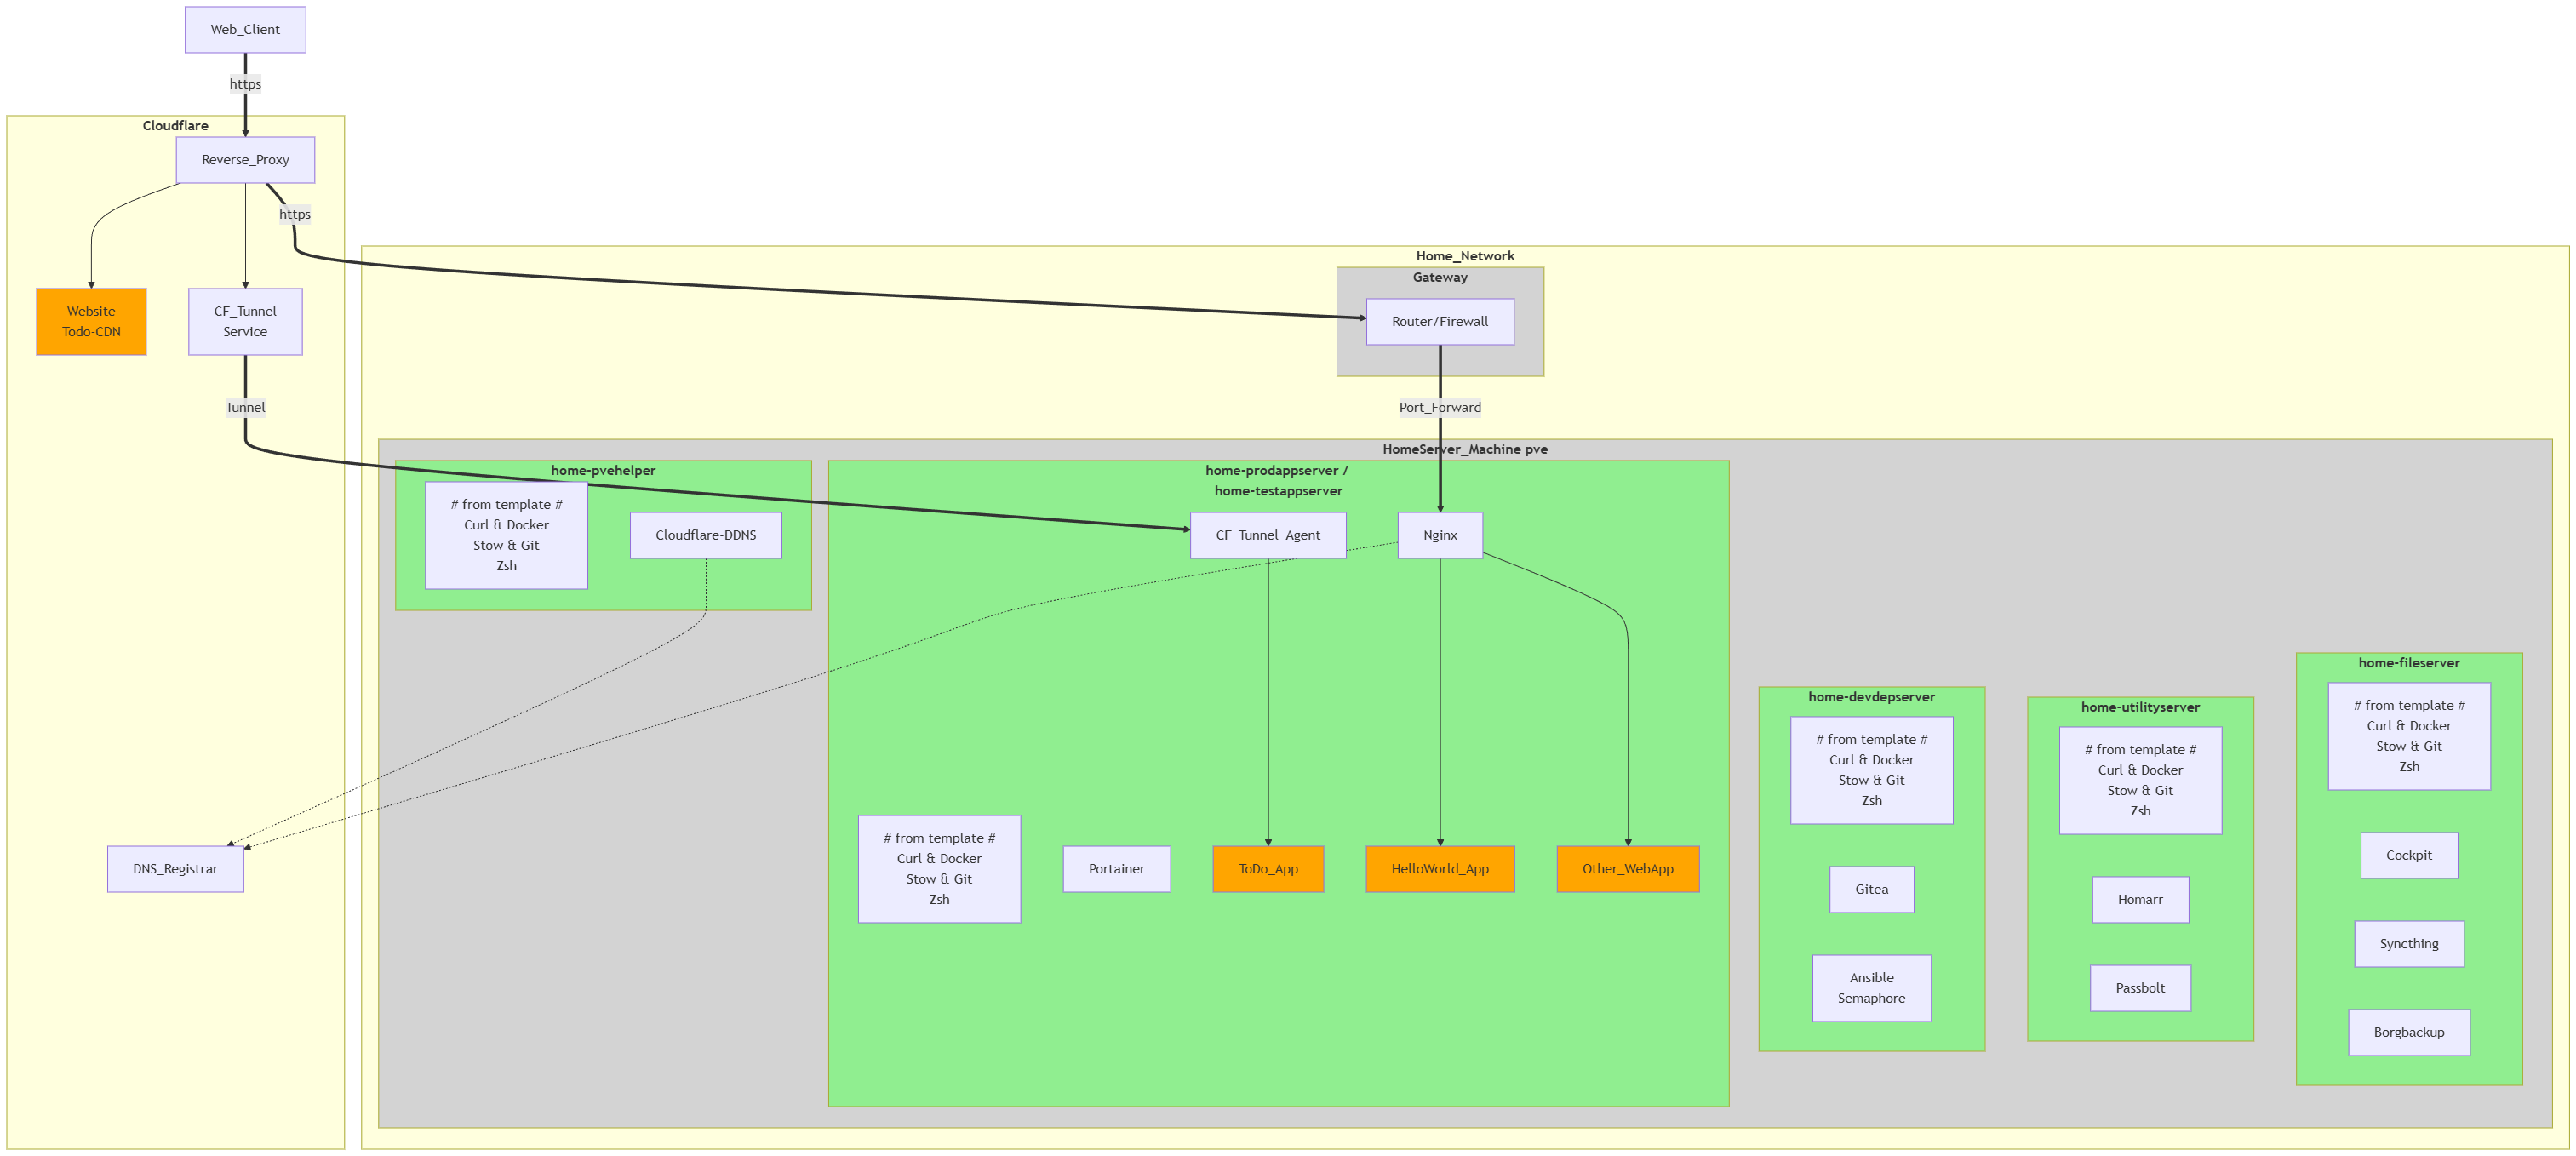
After this post, we’ll have the following situation:
With this project, I’m fully implementing all my ideas for the public website and a small virtual datacenter.
In the next project, I want to start further developing my ideas regarding a modern software factory:
application development tools, testing, security, CI/CD, OCI & Kubernetes, and app/infrastructure monitoring.
Result
1 - Purchase and installation of laptop
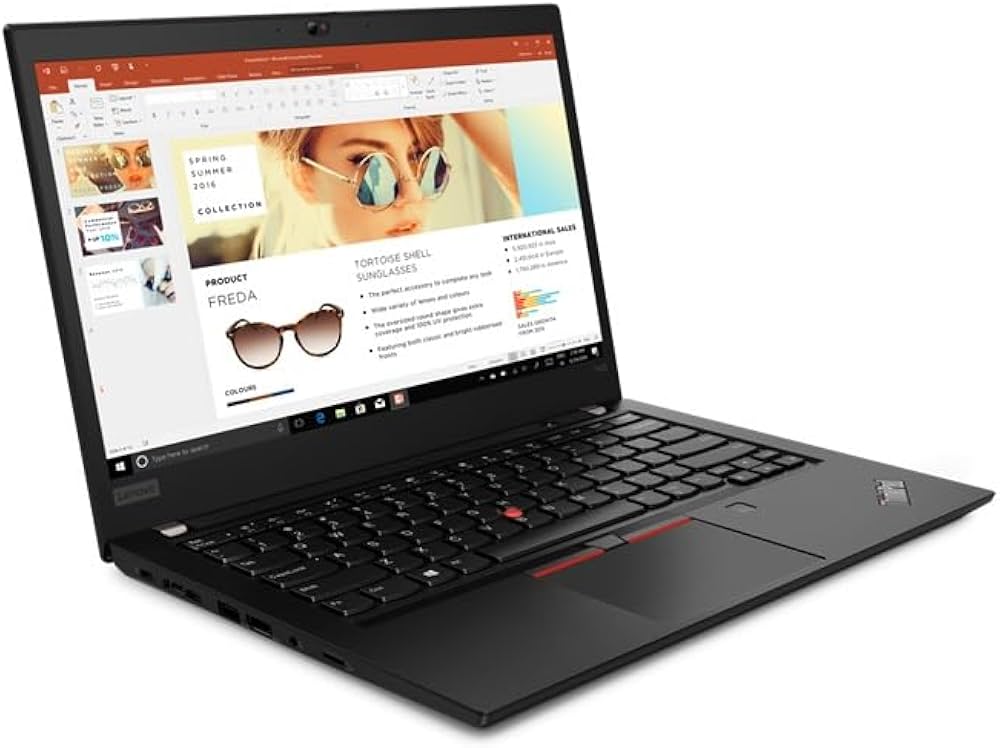
I bought my first laptop and installed Linux Mint as the OS on it.
I chose a refurbished business laptop, suitable for web development, at a budget price.
See Architecture of my laptop
.
I used this Linux Laptop to test and learn all the new software.
In the future, I will switch completely from Windows desktops to only Linux desktops.
2 - Security of home network, servers, workstations and software
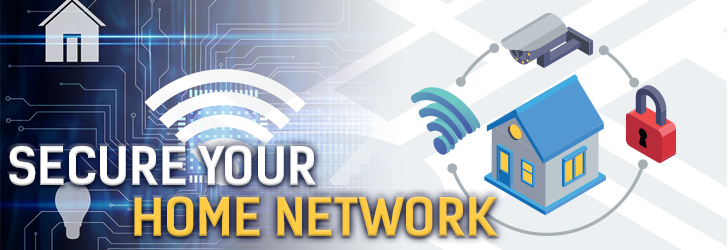
Because I want to make applications on my home network accessible from the internet,
I need to better secure access to local resources.
I also grant visitors at my home access to my Wi-Fi network,
and I also want to prevent them from accessing local resources other than the internet.
I therefore expanded my access security, and this was done at various levels.
At the network level, I tried using firewalls on routers and VLANs (virtual LANs).
By providing separate virtual networks on 1 physical network,
I can keep internet visitors and Wi-Fi visitors at home separate from internal users.
However, I am using a router provided by my ISP that does not support VLANs,
and therefore have to wait for an upgrade from my ISP.
The firewall rules on my router currently allow all outgoing traffic to the internet,
but block all incoming traffic (I will need to make very minor changes to this later in this post).
At the machine/OS level, I have installed and configured firewalls for all machines.
On my Windows desktop, this is the built-in Windows firewall,
and on my Linux Mint laptop, this is the UFW firewall software.
These workstations allow all outgoing traffic but block all incoming traffic by default.
Proxmox was installed as the hypervisor OS on my NAS/home server, and it provides a hierarchy of firewalls.
Proxmox software-implements its own internal network on the machine with a virtual switch,
which connects all LXCs and VMs to the home network.
At the node level and each LXC/VM level, Proxmox provides a separate firewall that needs to be configured.
See “Network and Firewall organization” section in Architecture of my home server .
Security must also be provided for every accessible service/application.
Security via SSH keys has already been implemented for the SSH service and Gitea server software.
The desktop and laptop workstation therefore have my personal private SSH key,
and all servers have my personal public SSH key to grant easy access.
For self-developed applications that are publicly accessible,
I only provide secure HTTPS or VPN access after (password) authentication by the user.
More explanation regarding the chosen authentication software will follow later in this post.
3 - Developing minimal demo web applications in Go
3.1 - Develop demo_hello application
First, I created a HelloWorld application “demo_hello” (with prefix “example-” in Gitea) in Golang.
For the implementation, the standard net/http en html/template library in Go were used.
I chose Golang as the programming language because it’s an easy high-performance language,
and ideally suited for running in containers/cloud environments.
This HelloWorld project will later to used to easily initiate development for all new Golang projects.
The repo contains the GitHub/Gite configurations, local Git configurations, and the Golang setup.
It also includes a simple makefile to simplify the compile, linting, and testing workflow through automation.
Other pipeline logic will be added later.
This way, a smooth development workflow was enforced right from the start.
See Golang by example - 01
for more information.
This and all subsequent application development repositories are publicly accessible in my GitHub / RobertTC32 account.
3.2 - Develop demo_todo application
Next, the “demo_todo” repo (with prefix “app-” in Gitea) was created with demo_hello repo as starter.
The repo structure was designed to contain not only Golang source code,
but also Golang test code, SQL script files, pipeline specifications, etc.
Next, I created a MariaDB database with SQL scripts for creating DB objects and test data.
MariaDB is a lightning-fast, open-source, and very popular relational database management system (RDBMS).
It is a direct ‘fork’ of MySQL, set up by the original developers.
In later projects, I will also use a MariaDB database in Kubernetes (with horizontal scaling and backup),
and then run performance tests on it.
After creating the database, an initial version of the demo_todo web application was developed.
This only displayed the database contents as todo rows in a table on the screen.
3.3 - Deploy containerized web applications on application server
For both web applications, I created the smallest possible OCI image,
and then installed these on my test and production application servers.
Due to a Windows upgrade, “Docker” and “Docker Desktop” suddenly stopped working.
I then installed “Podman Desktop” on my Windows desktop and tested it.
After a lot of testing, I was able to solve the problem with Docker as well.
Containerization and deployment were done manually,
but in subsequent posts we will automate this (ansible).
After booting up on the application servers, the web applications were tested within the home network.
4 - Making web application publicly accessible via tunneling
4.1 - Make demo_todo application accessible
The ToDo web application is hosted on my home network and isn’t readily accessible over the internet.
To provide public access, I first learned a lot about networking and created an overview.
See Overview of network technology
for more information.
In this overview you will find:
- Network technologies
- Network middleware to support websites and web applications
- Products to access applications in your home network from the Internet
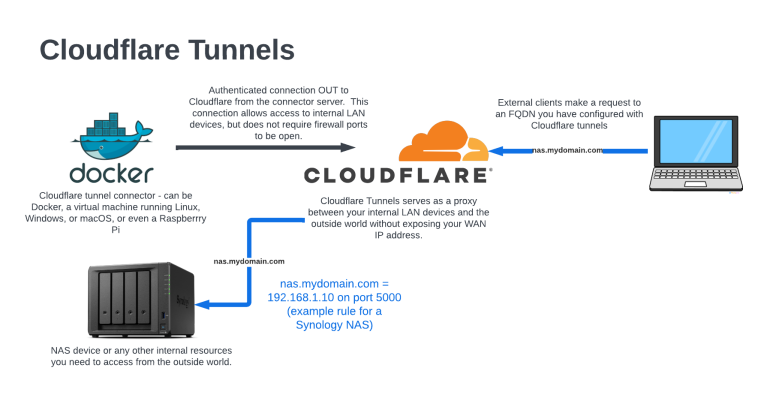
I ultimately chose to use Cloudflare Tunneling,
because I already had a domain name and a (free) Cloudflare account.
All I needed to do was create and configure a Cloudflare connector “cloudflared” on my LAN.
I installed the connector as a service on the Ubuntu app server (installation as a Docker container caused problems).
However, during the installation, I was required to add a credit card.
Using it is completely free, but the mandatory registration of a credit card is still a downside for me.
My ToDo application is now accessible via my public website on Cloudflare.
So in this section I installed the Cloudflared agent software on “home-prodappserver”.
After this installation, the demo_todo application is accessible via the “Demo” tab of this website
or directly via demo-todo
.
4.2 - Complete implementation of demo_todo application
The implementation of the web GUI was refactored to use the templ tool (vs Chi, Gin, Fiber, Echo) from now on.
For the web presentation, I used the already known tailwind css technology.
See Golang by example - 02
for more explanation.
For access to the database, I used the sqlx package,
which provides easier mapping and error handling for the db-access code in golang.
I chose not to use an ORM (like gorm) or code generation tool (like sqlc).
Finally, web screens were created to add or remove a todo line, or to change todo details.
For this, I used Htmx (vs AlpineAjax), DaisyUI (vs Shadcn UI, Tailwind UI) and later AlpineJs (vs Datastar) as additional front-end technologies.
Htmx is a small JavaScript library that adds new attributes to existing HTML elements.
This allows code for communication with the backend server to be executed in the browser without JavaScript programming.
DaisyUI is a UI component library based entirely on Tailwind CSS,
which allows you to create more beautiful web interfaces faster.
4.3 - Refactor the architecture of the demo_todo application
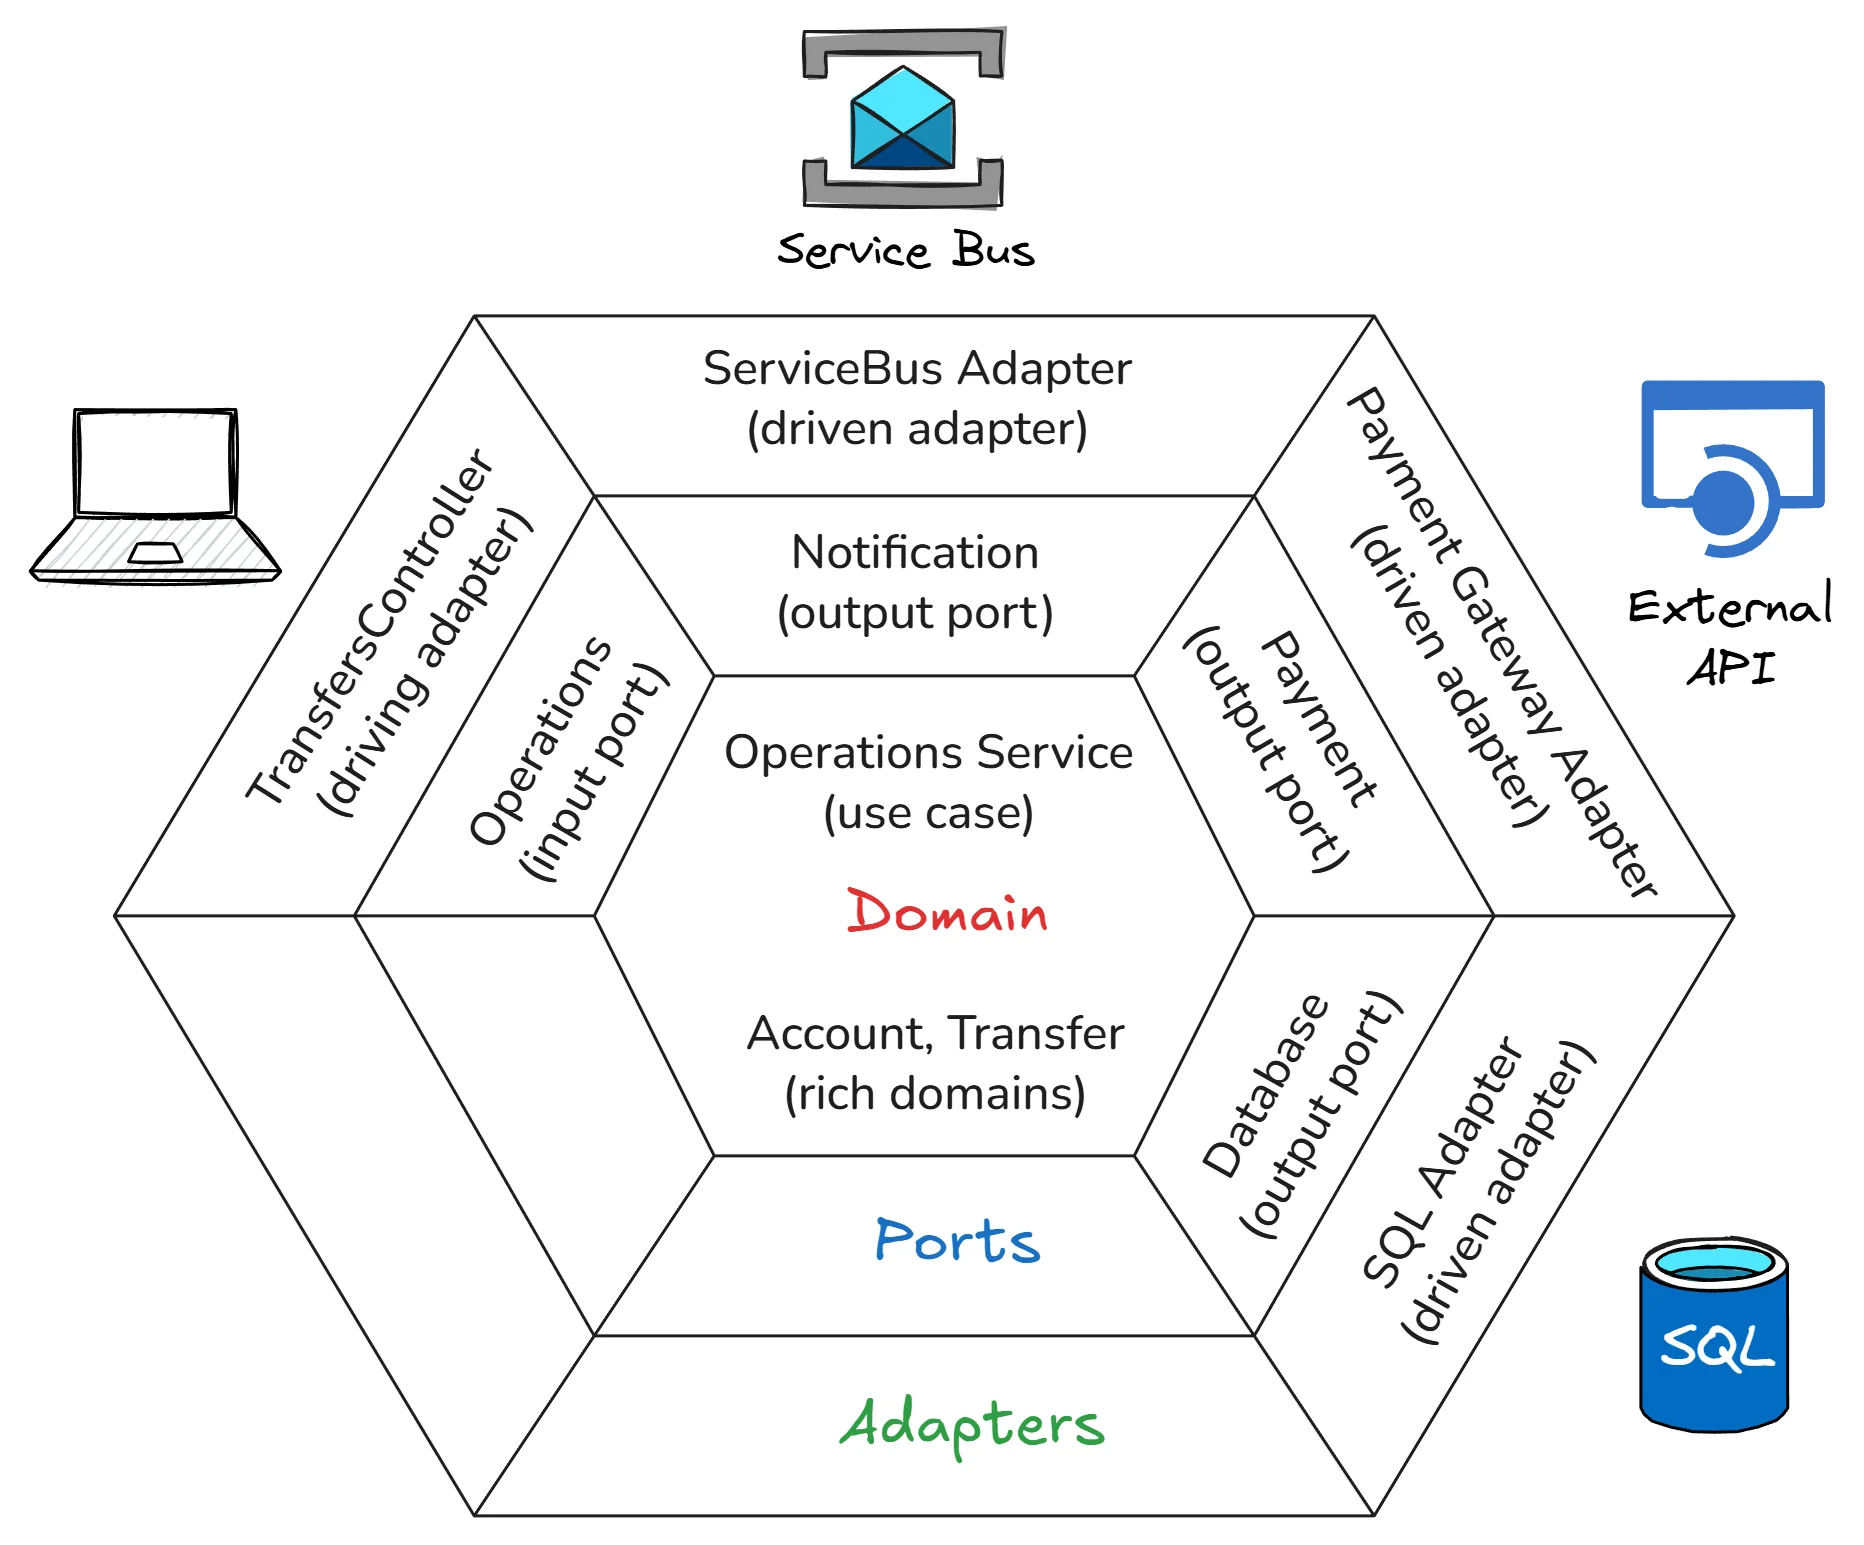
First, I studied the current main application architectures:
“Traditional Layered Architecture”, “Vertical Slice Architecture”, “Hexagonal Architecture”, “Onion Architecture”, and “Clean Architecture”.
For each architecture type, I examined the structure, terminology, rationale, advantages and disadvantages, and implementation method.
This took me a great deal of time and effort.
The entire demo_todo application was restructured to a “Hexagonal Architecture”,
to make subsequent testing and maintenance easier.
A very simple REST API was also added to access this application and to better test this architecture.
“Data Transfer Objects” (DTOs) were also used for the definition of port interfaces.
Error handling is not so simple in a web application:
- methods in the various ports (of the Hexagonal Architecture) can return errors,
and need to be well organized. - some of these errors are specific and require special handling (e.g. displaying them on the screen);
other errors do not require this. - errors in the UI layer must be passed correctly via HTTP to the web page in the browser.
All of this required a great deal of experimentation to find an implementation that is sufficiently elegant for the time being.
4.4 - Add CDN to demo_todo application
Cloudflare’s CDN functionality can be used to retrieve static web resources for web applications.
This allows this to be done much more efficiently and on the edge.
For the ToDo application, I therefore used this CDN capability to make the used JavaScript files,
for Htmx, htmx-ext-response-targets and AlpineJS (approximately 100 KB together) available on my personal CDN on Cloudflare.
The URL for my personal CDN is “https://cdn.robertthecoder.org”.
As a result, these files are available faster upon upload, but the Docker image of my application is also smaller.
This results in the following architecture:
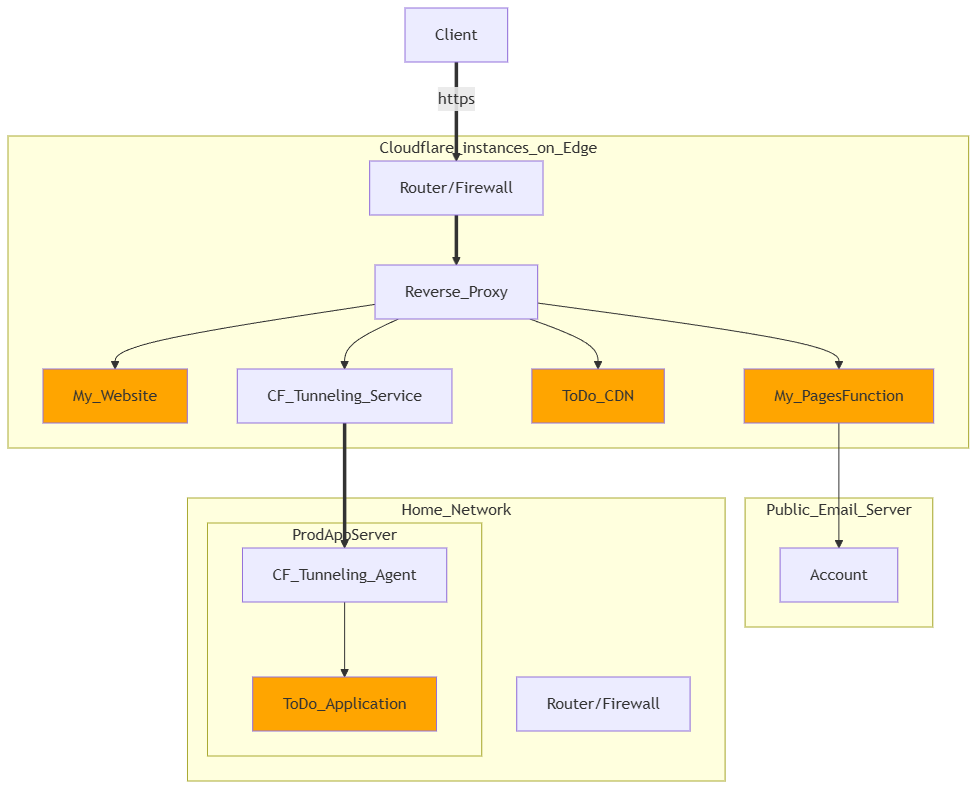
This image was created with “Mermaid” software.
I used “Markdown Preview Mermaid Support” and “markdownlint” as VSCode extensions.
In previous projects, I already used “PlantUML” and “Drawio” in VSCode to create diagrams.
Mermaid can only create simpler diagrams than PlantUML,
but the renderer is already included in GitLab, GitHub, and Gitea.
5 - Make web applications publicly accessible without tunneling
5.1 - Install port forwarding and dynamic DNS
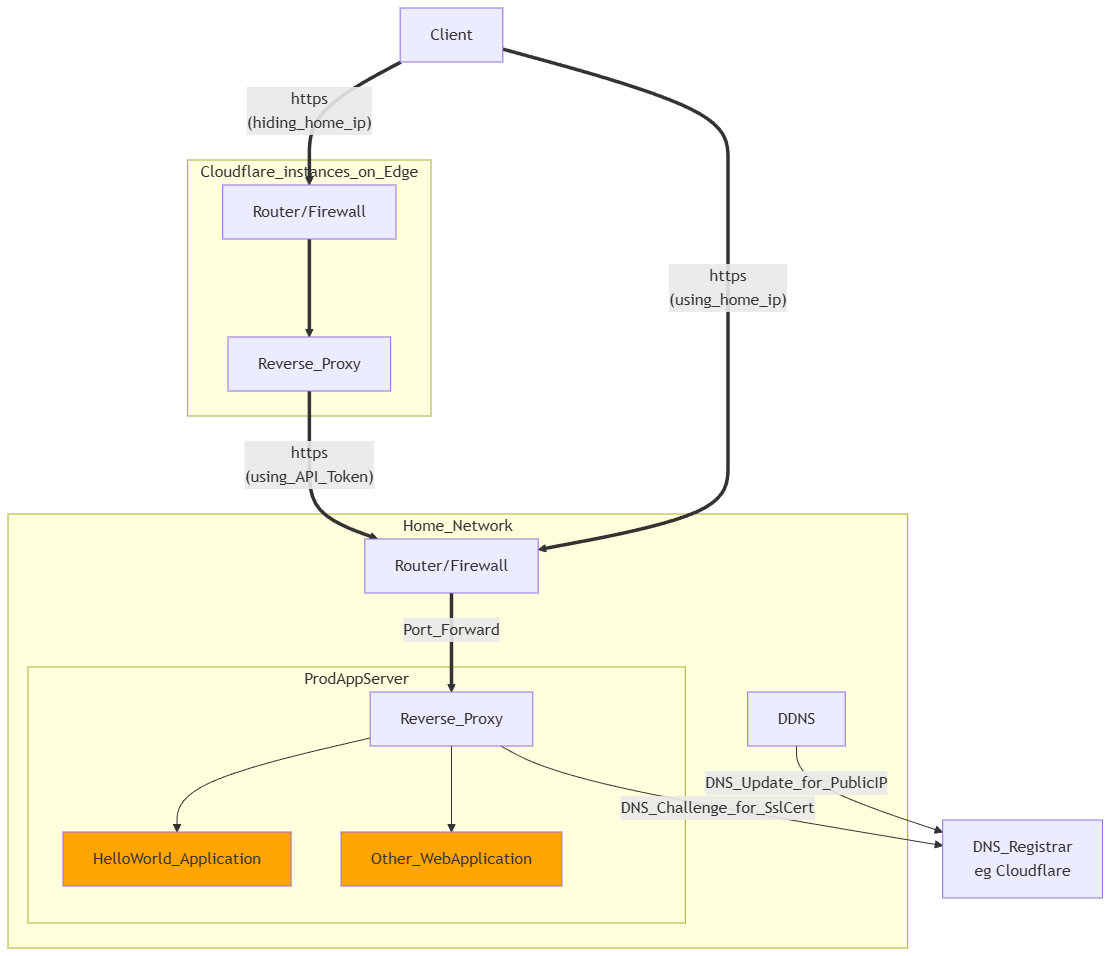
I will later also make multiple self-hosted web applications public without tunneling.
To this end, I configured port forwarding on my ISP router,
so that external http(s) requests are passed on to my deployed demo_hello application on my application server.
This does require a static public IP address, which I, as a regular internet user, did not receive from my ISP (Telenet).
I solved this by using “Dynamic DNS” (DDNS), which is supported by my DNS Registrar (Cloudflare).
On my proxmoc machine, I installed Cloudflare-DDNS software,
which I have pass my external home IP address to Cloudflare every hour.
Special subdomain of my DNS name (as A DNS record), namely “app-demo-hello.robertthecoder.org”,
is thus mapped and kept up to date, with my public home IP address.
By also using Cloudflare as a proxy, I can keep my own public IP address hidden.
This then results in the architecture shown above.
5.2 - Install reverse proxy and HTTPS support
I want to make multiple self-hosted web applications public later with HTTPS access and without tunneling.
To this end, I installed Caddy as a lightweight reverse proxy (vs Traefik, Nginx).
I changed the port forwarding on my router so that HTTP and HTTPS requests are passed through to this reverse proxy.
This reverse proxy will convert the HTTPS request into an HTTP request,
and forward it to my self-hosted demo_hello and other web applications.
Using HTTPS also requires a valid SSL certificate.
Caddy handles this automatically (with ‘Let’s Encrypt’) for direct access.
For access via Cloudflare, this can be done via a DNS Challenge between the reverse proxy and Cloudflare.
Caddy, acting as a reverse proxy, supports this DNS Challenge handshake after installing an additional Cloudflare module.
After this installation, the demo_hello application is accessible via the “Demo” tab of this website,
or here via demo_hello
.
In the same way, in the future, I will also make other self-hosted web applications publicly accessible alongside demo_hello.
6 - Add error handling and access security to web applications
6.1 - Install authentication and authorization middleware
I choose Authelia (vs Microsoft ADFS, Keycloak, Authentik), a free and open-source OpenID Connect 1.0 Provider.
It is a lightweight, fast, and secure solution for authentication and authorization of web applications,
by providing two-factor authentication and single sign-on (SSO) for your applications.
It acts as a companion for reverse proxies (like Caddy) by allowing, denying, or redirecting requests.
I installed the Authelia software alongside Homarr on “home-utilityserver” Linux container.
I then integrated Authelia in my Caddy reverse proxy configuration.
6.2 - Add user authentication and authorization in demo_hello application